Wednesday, 18 November 2009
to do list
hi poppy your blog was full marks but this year we want to complete three documentary films instead of three essays, so i will go through this tomorrow.
Wednesday, 29 April 2009
 shot 10


Thursday, 2 April 2009
After Effects
On reviewing the film, we felt that a filter effect called " day for night" would transform our clips to something more earee. Night is typically known for dull moon lit compositions and wanted to try this out on After Effects. We imported our film introduction into After Effects and applied the effect " day for night" with a minimum strength of tone. We wernt sure weather the audience would respond to the change in lighting but when we asked 6 students, all thought the darkened version was scarier. Although we liked the effect, we didn't like the effect on the titles as instead of the writing turning from white to red, it turned to blue from red. This looked really awful so using after effects we needed to remove the "Day for night" filter on the titles and institution. This will be the last step to the completion of our film introduction.
Tuesday, 24 March 2009
Sound
Once all visual apects of my film were complete I needed to add sound to my film introduction. I felt that a sound track or song would be far to cliché but atmospheric music and sounds from bridge pro scores mixed together would create the correct atmosphere wanted. We added a sound bridge at the beginning of our film introduction which consists of an atmospheric track from bride pro scores. the sound bridge stays at the same level throughout the intoduction until its broken by a decrease in volume when the tital is shown on screen. This was done by lowering the sound levals at the partiular points where the tital where shown on screen. the sound bridge ends just before the underwater scene where a new sound bridge is put in place. the new bridge sets the scene for the earlier underwater scene as I felt this sound needed to be at a different tone to the rest of the introduction. The sound bridge fades out throughout the underwater shot until it cuts to a shot of "The Common" in which a short, intense sound is played which will emphasis the idea of suspense and will want the audience to watch the rest of the film. Sound motifs are played at the start of every shot just after the lowered volume of the titles. this will emphasis the importance of what's happening in the visual clips of Vanessa and less emphasis on the titles. To get the clips from bridge into imovie to edit i imported them.

A close up of my sound editing using iMovie on my half of the film introduction

Wednesday, 18 March 2009
Titals
Screen grab of us using After Effects

Onse completed my editing using both iMovie Hd and after effects i needed to create titals for my film introduction. I want my film introduction to be effectivly simple and striking and wanted this to be mirroed in my titals. Using i movie both me and my partner kimberley began with a black background. We then chose a striking font which was inspired by the simples titals from "The Grudge"using the "Helvetica" font. we wanted the font to be white then transitioning and fadeing into a deep red representing fear and then fading back out again. we then repeated the teqnique 8 times authough moving the placement on composition slightly on each tital to give variety. Our titals last 4 seconds which in total adds an extra 32 seconds to the film introduction
Once we had out titles complete we needed to create a shot that would say “ The common” which is the title of the film. This shot will be shown at the end of the film introduction. To create this shot, the font used on the front covour was our inspiration. It was more complicated than the subtitles but not over the top. The red font saying “ The Grudge” is eye catching and stark and had a texture effect to it. To re create this eye catching font I used an image of a rock surface with deep texture as a layer underneath “The Common”. we then chose a black background so that the to be white and red writing would be vivid against the dull background. We chose a similar font called “....” although we felt it was to simple and not profetional enough for what we wanted to achieve. We then went through all of the fronts until we found the font “ Cracked” which looked like “ The grudge” font we had found the perfect text for our introduction. We used the fading tool so that “The Common” would appear a dull white then gradually fade into a red representing rage. I then adisted the opacity leval of the coloured layer of the font enabling the textured rock pattern to show through giving a rustic effect. The rock represents the habitat of the common. on reviewing the font for the “ The Common” title I felt it still needed an effect. I experimented using the blurring and distortion effects until It looked professional and earie. It shows on the screen a distorted blurry structure then focusing into “The Common” font white turning red then distorting back out again. The screen turns back letting the viewer take the intensity in enabling them to watch what would be the rest of the film.


The Stone Photograph we used as a layer

Screen grab of us using After Effects

One of The finished Titles
Monday, 2 March 2009
Titles for film
Today we looked at subtitles from "the grudge" to see the size and amount of titles shown.
This will help us to decide what titles and what text we would like to use.
Titles From "The Grudge"
Colombia Pictures
A Film By...
Name...
Title
Name...
Name...
Name...
Name...
Name...
Name + Name...
Name + Name...
With...
And...
Casting By...
Music By...
Editor...
Production Designer...
Director of Photography...
Co-Producers...
Executive Producers x 2...
Produced By...
Based On & Written and Directed By...
Screen play by...
Titles For "Alien"
A..Production...
A Film By...
Name...
Name...
Name...
Name...
Name...
Name...
And Name as...
Music By...
Executive Producer...
Screen Play And story By...
Produced By...
Directed By...
ALIEN
I feel both these films had far to many titals that interest would be lost by the viewer. For my film introduction 8 titals will be keep the viewers attention on their highest leval.
Wednesday, 28 January 2009
27th janurary
Today I am going to start to edit my film using imovie. I am going to experiment with the brightness and contrast to see if in fact colour in my movie introduction would work better. My decision changed because my underwater shot would look really uninspiring in black and white.
Thursday, 22 January 2009
Using After effects
This was edited using adobe after effects. I decreased the brightness and increased the contrast to give some depth to the atmoshpere. i also copied a section of my shot where the water was moving and pasted it into the shot where the ceiling was very visible to reduce the look of it as that isn't at all realistic for sea.
Wednesday, 21 January 2009
last shooting
today i went to portelet common to film my last shot of Vanessa pushing her Innocent victim off the cliff. I positioned my camera on the beanbags on the floor for a low angle shot. the reason for this being it needed to look like she was pushing the actor off the cliff but she was really just pushing him down the hill. the weather was clear and dull, which will help my film shots to flow and not disjointed as my other filming day had the exact same weather conditions.
Problems i faced were the grass my actor and actress had to stand bare footed, and lie in were very thorny. This created a lot of discomfort. the male actor had to help the younger actress along the grass by carrying her.
I have completed filming my 5 shots and i am able to start editing using iMovie and After effects.
Tuesday, 20 January 2009
Monday, 19 January 2009
Filming the underwater shoot
myself and max Holley, who is the male actor in my film organized in advance to film at Langford pool today which is the 19th of January. in these two shots i will be filming i got my male actor to wear a dark shirt and jeans which he would be wearing similar in the not underwater shoots. inspiration for this shoot greatly came from the shot in the borne ultimatum. i placed the camera at the base of the pool which would enable the exact--- shot i was looking for. i got max to fall into the pool backwards and float lifelessly ( just like in the borne ultimatum).
once uploaded, i feel that these shots will look really effective in my film. Using After effects will help dramatically with this. I will experiment with After effects tomorrow.
problems i faced were:
the pool was 1.8 meters deep which didn't enable a full body shot as it hit the water, but on rewing it, i think its far more effective.
the clothes i provided max with were far to large round the waist so i had to find a rope to tighten the waist band with.
the lights were purposely turned of in the swimming pool for the dark and dismal look i was looking for although some natural lighting couldn't be blocked out. This will mean in post production i will use after effects to create the correct lighting.
Thursday, 15 January 2009
filming two
On the 26th,27th and 28th of january we are going to film shots 2,3,4 and 5 during our lunch breaks. On the 23rd of January i am going to film shots 9 and 10 which i will film in langford pool.
Wednesday, 26 November 2008
Film Poster

This Is the Poser for our film we created on Photoshop. Our main inspiration was from the Grudges poser. The black around the eye symbolizes the hair, her own barrier from the outer world and the only thing that can cover her face and perhaps cover the wrong things she has done. To create the Poster, we changed the opacity levels of the original photo i took of vanessa on photoshop and then placed the hair from the grudge over the top using a different layer. The text says "it never forgives, it never forgets". The reason for this being is, Vanessa never forgave her elder family member for abusing her and she will never forget it. We used a quote from "Empire magazine" as they are a major magazine which looks at films using the quote"The most intense film of the year" which will automatically want the audience to watch it. Other texts we included were both mine and Kimberley's names and Vanessa Reynolds as she has the starring role in our film introduction. I am very happy with The Final result as I feel the photograph is very unnerving and has an almost ghostly element to it due to adjusting the opacity level.
Tuesday, 25 November 2008
Film poster inspiration
I want to create a cover for my film " The Common" using photoshop. I have been researching many different styles and formats to find exactly what I'm looking for. Here are some of the selected few of covers I would like my cover to be inspired by.
This is effective because of the black space on it. I want to use a similar idea on my poser.


Poster above stands out for me because of the catch unnerving slogan"it will get under your skin"
The simplicity of this poster attracts me to it whilst still portraying horror

Experimenting with my clips
Above are the same sequence I created using iMovie, although one in colour, one using the black and white effect. I feel the black and white sequence creates the right atmopere I'm looking for. Without the colour aspect, it almost leaves the audience feeling unknowing and on edge as not everything in the picture is given away. The moody contrasting monochrome shades add dynamics.
To create this sequence, I merged some of the shots I filmed at portelet common until continuity was present. I didn't show the character throughout the sequence until the end, for the reason of i want the audience to really want to no who this unknown character is who has pushed an Innocent victim off a Cliff. i also didn't want to overpower the audience with shots of her face as it could perhaps look cheap and unprofessional. to give my sequence even more atmopshere i added music which created suspense, and also the sound of a heartbeat building up speed until the shot of Vanessa's face on screen. I then got the music to fade out gently unlike a sudden Holt which i don't think would work.
Saturday, 22 November 2008
Experimenting
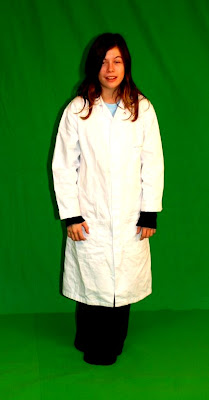
This Is one of the shots I filmed at Portelet common. I wanted to show the comparison of both black and white and the original. I personally really love the black and white because of the crispness of her white shirt among the less so bright foreground and background and feel the original green background isn't at all inspiring. The Subtitles colour could lead into anything using the black and white effect whilst the green background could only lead to a colour that complimented it, unlike a tacky colour that clashed with it. My work partner thinks the opposite of what I do, so I don't no what is going to happen.
Thursday, 20 November 2008
This technique only uses 1 layer from the original shooting, and the other layer is from the shooting using the green-screen of kimberley walking. In "after affects" we adjusted the contrast and brightness, hue and saturation and then merged both layers together to create this effect. to remove the green background, I used the plug in on "after effects" called key light. I then told it to take out the background colour green.
Wednesday, 19 November 2008
Greenscreen Experimental
Today in media after experimenting with changing the opacity level in the 2 layers of shots, we wanted to try and produce a similar effect but differently. This enabled us to use the greenscreen as this was just to test out the procedure, Vanessa was not needed and we used Kimberley dressed in a white gown like Vanessa in our film introduction. I got Kimberley to walk on the spot in front of the greenscreen as I filmed her using the canon LX2. Below are the shots I filmed of Kimberley in front of the greenscreen and Kimberley and I talking about what we wanted to achieve in this Piece edited on iMovie.
Kimberley infront of greenscreen
Me filming kimberley walking infront of green screen

Tuesday, 18 November 2008
Test effects
Today we experimented with the program " After Effects". As mentioned in the past post,whenever I filmed a shot of vanessa engaging in movmenet, I took a shot of the location in the exact position, only just without Vanessa in so that in post production I would use both layers and adjusting the opacity to create an almost ghostly character which could appear and re-appear on and off the screen. For me I really love this effect.Not only will this keep the audience engrossed in whats happening but if done well with practise using " After Effects" it could look outstanding.
Monday, 17 November 2008
First shooting day
Today, myself and my partner Kimberley went to Portelet with our actress Vanessa to shoot shots 1, 7 and 8. I filmed shot 7 and 8 and Kimberley filmed shot 1. The weather today whilst shooting was dull and dismal with light patched of drizzle. We thought we would use the weather to our ability instead of against us. The crispness of the white sky created the atmosphere we were hoping for. As we need to shoot 5 more scenes at the common we will have to choose a day with very similar weather. As it is winter this shall not be to much as a challenge. We shot our 3 shots using the canon XL2 over a 3 hour period. The lengthy time was due to the variety of different angles shot. I Filmed shots of the area and then the exact same area again but with Vanessa in it so that in post production i can put the area shots behind the Vanessa shots and create an almost ghostly eerie character. This may turn out far to unprofessional for what were aiming for but once experimented using iMovie to try and create this effect, this could be exactly what we need for our film.
Eqipment we braught with us today were:
Canon LX2
Tripod ( for steady shots)
Stepladder ( my idea because i wanted shots from abouve vanessa)
Beanbags( so that the Canon LX2 was able to lie stabely flat on the floor angeling upwards)
Canon powershot A540 ( camera i braught to take photographs for my blog)
White Nighty

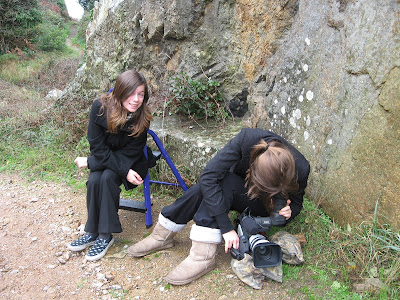
Vanessa and I with the Camera( which was covoured at the time due to drizzle)

A problem we faced during filming was the actress had to do it barefoot but she got thorns in her feet. To help reduce this problem I Transported her on my back from each shots, see below for photograph.


I supplied our actress with food and warm clothing to ensure her acting will be the best it could

Low angle shot

Used Beanbags to create a steady stand for another low shot
I am stood on the stepladder trying to shoot an areial veiw shot
 Areial Shot

Filming Vanessa

Friday, 14 November 2008
What I need to Do to Be able to start filming
Today me and Kimberley decided on a date we will shoot storyboard shot 1, 7 and 8. we have organized our actress vanessa to take half a day out school on monday 17th of november. We will bring the Canon XL2 with tripod, Stepladder for high shots and a white nighty to the location of Portelet common. As our male actor will not be able to participate in the first shooting session at Portelet common we will have to plan another date where both female and male actress are able to participate. As Kimberley and I are doing half the films editing and filming each, I will be shooting shot 6,7,8,9 and 10.
Today I also rang up Le Quennevais sports centre to ask permission if we would be able to use their pool to shoot our underwater shots in the story board. This has Been booked for sunday 23rd of november at 11 am. As Shot 9 and 10 are underwater shots, I will be the one filming. I will be shooting our actor Max Holley falling into the pool unconsciously and slowly floating into the depths of the pool. I will be using The ......... to shoot these shots.
Tuesday, 28 October 2008
Arial shot of location
Today, both Kimberley and I went on an around island plane journey and took an arieal photo of Portelet Common.


Friday, 24 October 2008
Tuesday, 21 October 2008
The Storyboard
This is the finished storyboard which I accomplished
shot 1
 shot 2
shot 3
 shot 4
shot 5

shot 6
 shot 7
shot 8

Monday, 20 October 2008
Storyboard preparation

Me and Kimberley Dunne went to our location to shoot our storyboard shots
shot 1

shot 2

shot 3

shot 4

shot 5

shot 6

shot 7

shot 8

shot 1

shot 2

shot 3

shot 4

shot 5

shot 6

shot 7

shot 8

Shot 9

Shot 10

Subscribe to:
Posts (Atom)